Seasonal Handwork-Miso Making

Ever since childhood, I have been interested in making things that take time and effort.

It’s nice to have convenient and easy things to do, but I was not interested in them. 

My elementary school teacher and my parents called me “slow” since I took longer than others to do many things.
So, when I started practicing macrobiotics, I thought that macrobiotics, which require careful time, were suitable for me.

Many people say that macrobiotics is difficult and challenging, but what macrobiotics teach is the principle for humans to live a healthy life, so it’s not complicated.
But it changes by season, the type of people’s constitution, and their health condition, so since we (humans) are so out of touch with nature, it has become too complex.

Of course, it takes time and effort to be done.

But learning anything for the first time isn’t easy; you’ll improve with practice and practice. For example, playing the piano in music or playing tennis in sports can only be done easily if you are incredibly talented.

The reality for me is that after getting sick and being unable to walk due to a near death car accident, I had to think about my own lifestyle and how to live. Then, I practiced what I could and practiced again and again, and finally, I could do it comfortably.

In fact, it wasn’t until I had more leeway in my life that I started making traditional Japanese handmade items and other items little by little. I now make about 10 different products (e.g., Miso, Yuzu pepper, Rice bran pickles, Natto, Orange marmalade, Umeboshi plums, Ume plum enzyme juice, Ume plum sauce/jam, Rakkyo pickles, Red ginger pickles, and Dried whole persimmons) every year with help of my husband, Eric.

I’m a tortoise, so I slowly prepare to welcome the new year every year. At the beginning of January, I start writing down my goals for the year ahead, and then February arrives.
Around that time, I start making miso.
It is the perfect time to make miso.
Because the temperature is low, fermentation can take place slowly and thoroughly.
During the cold season, there are fewer bacteria, which can prevent mold growth.
One of the reasons is that you can use soybeans that have just been harvested in the fall.


Nowadays, many people use miso within about three~six months of making it, and miso companies also need a place to store it. If it takes time, it will take time to sell, so it seems like a sad situation that more and more companies are selling their miso in a short time after they make it.


In fact, when miso is left to age for two or three years, amino acids and vitamins that are not present in soybeans or are present in small amounts are produced through fermentation, increasing its nutritional value. Soy protein is broken down by enzymes and becomes water-soluble, and some of it becomes amino acids. Among them are eight types of essential amino acids that are essential for maintaining life, as well as vitamins (B1, B2, B6, B12, E, K, niacin, folic acid, pantothenic acid, piotin) and minerals (sodium, potassium, calcium, It contains abundant nutrients such as magnesium, phosphorus, iron, zinc, copper, iodine, selenium, chromium, and molybdenum), monounsaturated fatty acids, polyunsaturated fatty acids, and dietary fiber.
The salt mixes well with the soybeans, giving the dish a rich, umami flavor rather than a salty taste.


Therefore, I recommend using miso that has been aged for 2 to 3 years, but these days, aged miso is almost impossible to buy and is inconvenient.
We can’t find aged miso sold in the Japanese market and health food stores where we used to buy it here in the United States (near Los Angeles), so the miso they sell tastes salty.
I haven’t lived in Japan for a long time, so I don’t know much about what kind of miso is sold in Japan, but aged miso is probably hard to find in Japan as well.

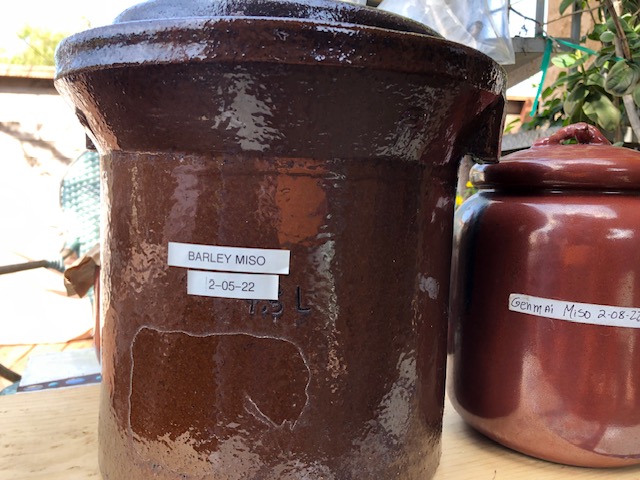
So, I decided to make my own miso a while ago after I recovered from stage IV cancer, only weeks live.
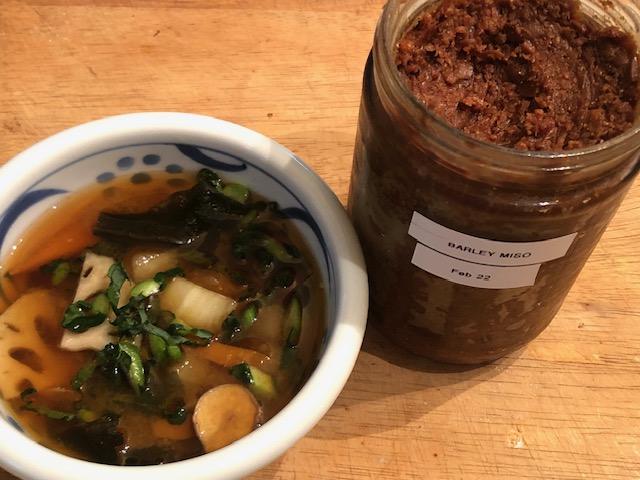
This year, I pulled out the miso in the earthenware pot I made two years ago. The aroma and taste are great. I wish I can share them here.
Of course, I have so much love for this miso because I have been growing it with my care for two years.

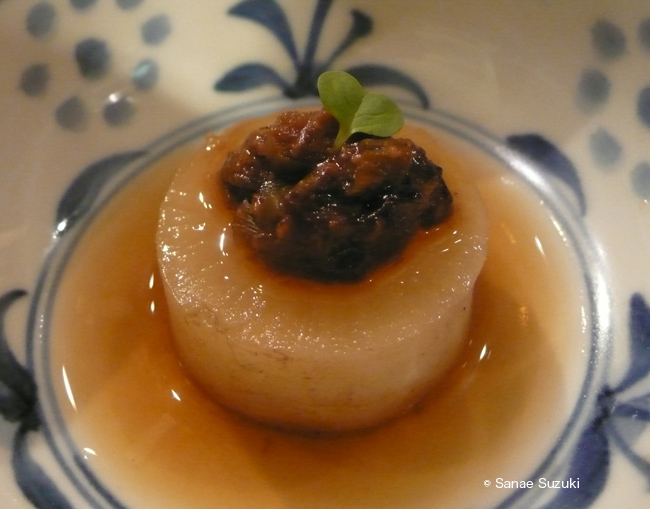
I made miso soup with my two-year-old miso.


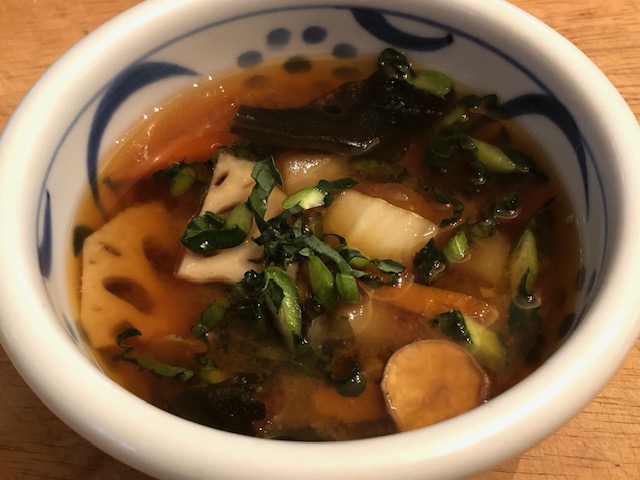
I only needed to use less than the usual amount of miso I used to get the flavor.
It was so delicious!
The miso can be used in various dishes such as stir-fry, stew, dip, and miso dressing and many more.

You can easily see the benefits of miso on the internet if you look into it.
Promotes digestion and absorption – has the effect of working on the digestive organs.
When you absorb the salty taste of miso soup into your body at the beginning of a meal, your stomach and intestines begin to move, allowing for efficient digestion and inhalation, which reduces the burden on your body.

Suppression of blood cholesterol levels
Soybean lecithin and soybean peptides contained in soybeans can suppress the rise in blood cholesterol.

It has also been reported to have other beneficial effects, such as neutralizing nicotine, preventing cancer, and preventing aging. And much more!


Making your miso is not difficult, so why not give it a try?

Here is the recipe I have been using.

Miso making recipe:
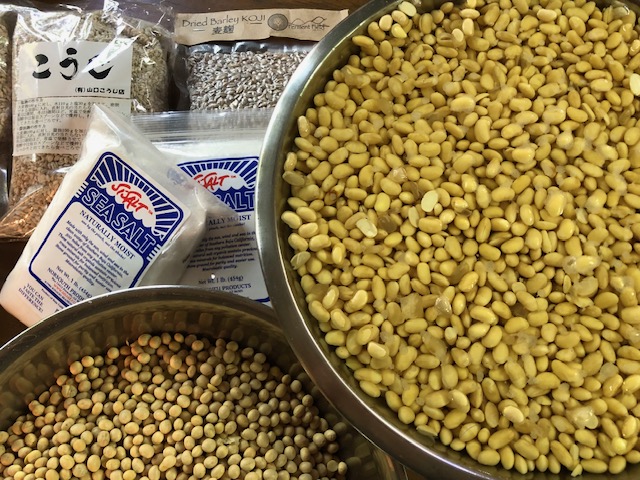
・Organic dried soybeans) 300g
・Koji (rice malt or barley malt) 200g
・Sea salt 120g
・Earthware container/pot
・Storage cotton cloth

What to prepare

・Stainless steel pot, colander, bowl,
 · Ladle
・Wooden pestle,
・Organic cotton cloth or Cheesecloth
・Baking sheet
・Weight
・Vinyl gloves (only for those who are interested)
・Alcohol spray or shochu or salt (only for those who are concerned)
・Stainless pot, calendars, bowl, 
・Vinyl gloves (only for those who are interested)
・Alcohol spray or shochu or salt (only for those who are concerned)


1. Wash the soybeans 2 to 3 times.
2. Add three times as much water as the soybeans and leave it overnight.                               Soybeans will expand by 2 to 2.3 times. It takes about 8~12 hours! Remove the skins from the float beans to the top and drain the water.


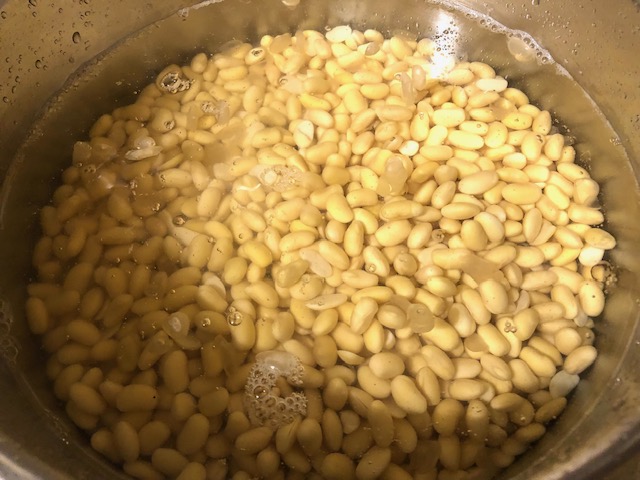
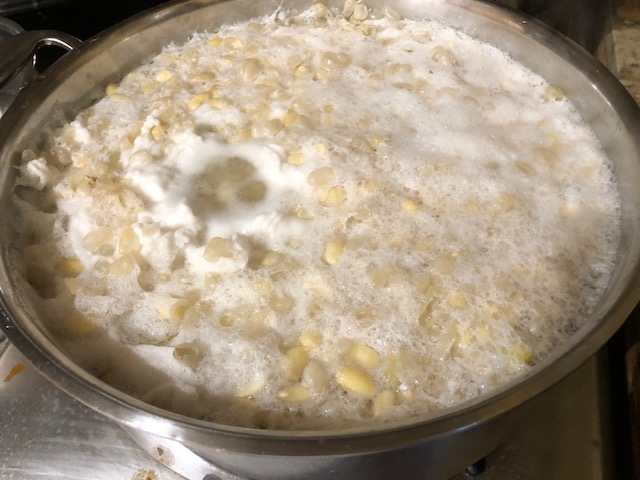
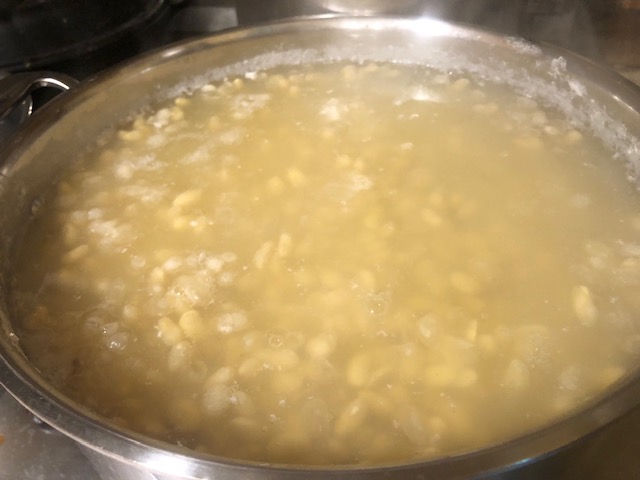
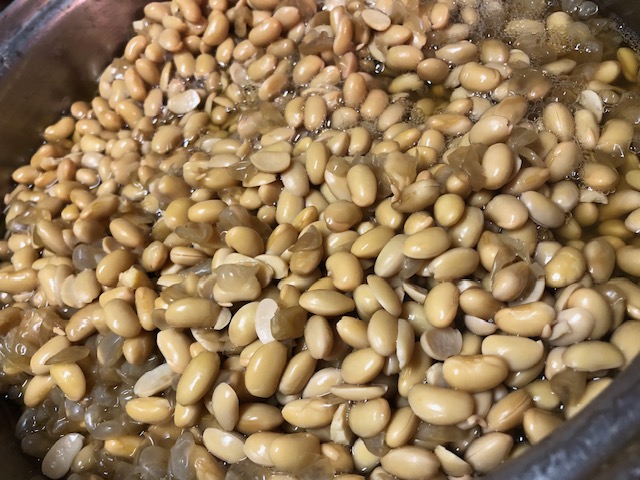
3. Add enough fresh water to cover the soybeans, heat over high heat at first, and once it boils, remove the scum. Then, boil slowly over medium heat and add the water if you need. Take a form out with a ladle. It depends on the pot, but the approximate cooking time is about 3~5 hours.


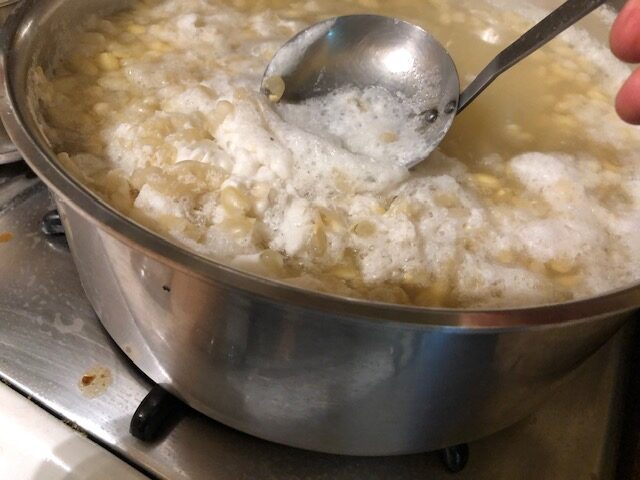
4. When the soybeans are soft enough to be crushed between your thumb and little finger, turn off the heat and drain the broth using a colander.

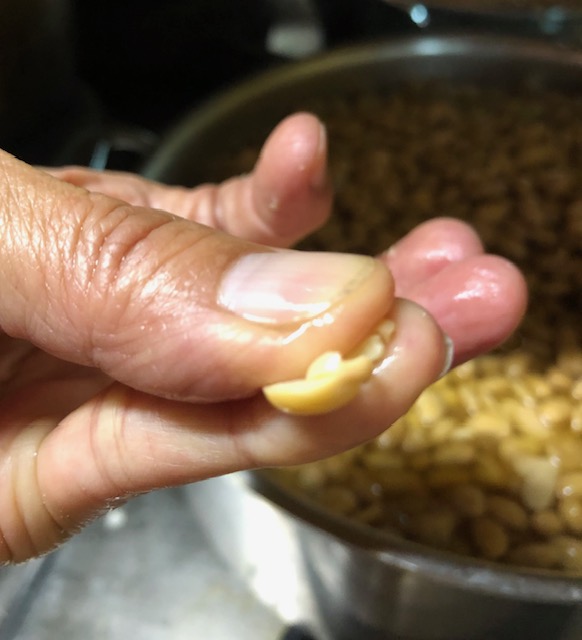
Keep some cooked broth to add to making miso later.
Boiled soybeans are perishable, so I recommend making miso as soon as possible.
(if you don’t prepare them right away, store them in the refrigerator.)


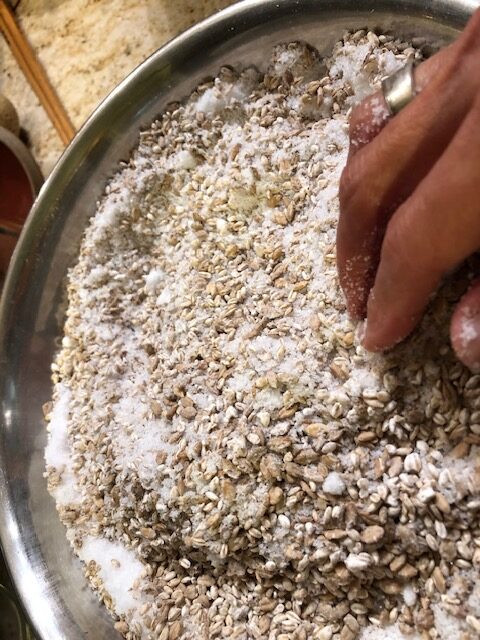
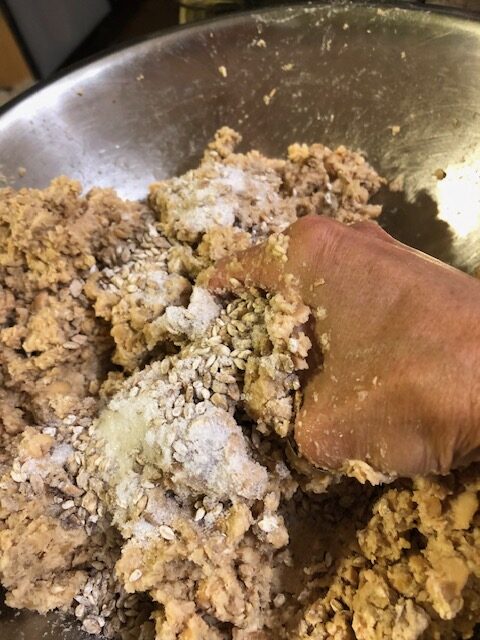
5. Now, make the shiokiri koji.


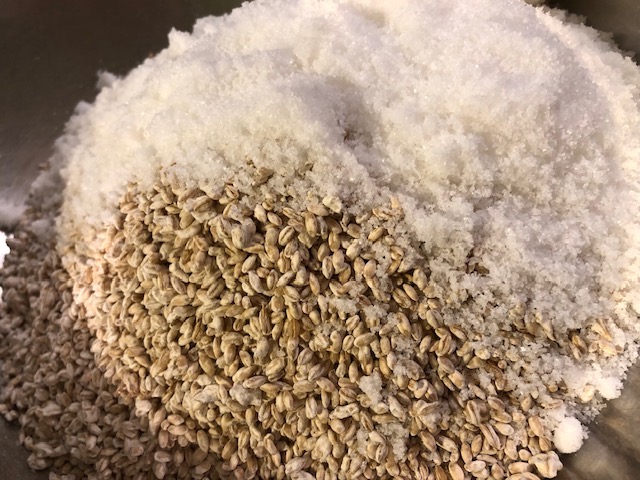
Add sea salt to naturally thawed koji to mix them well.
I usually mix a little by little by hand.


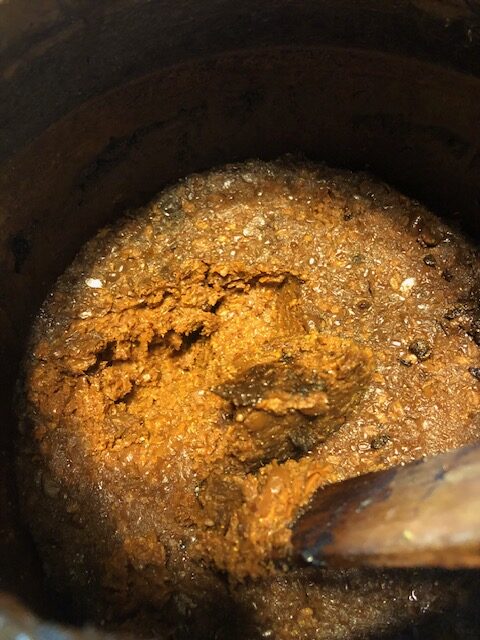
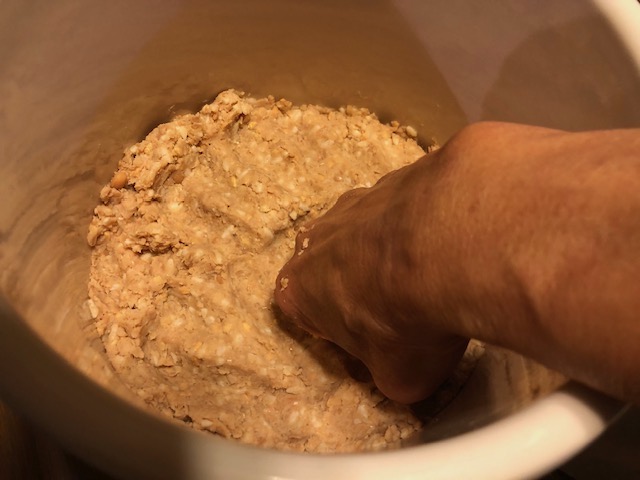
6. Place the boiled soybeans in a bowl and crush them by a wooden pestle and hand until they are no longer in shape. I like to keep some of the beans as they are so they have texture when miso is made.

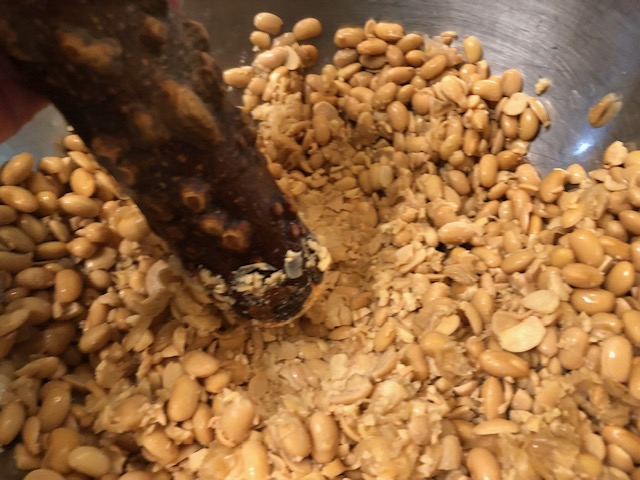
It’s easier to mash it when it’s warm.
(if it’s been refrigerated, you can warm it up a little.)


7. Add salted koji to the soybeans and mix. Check the moisture level and add a small amount of cooked soybean broth (usually around 10 to 50 ml) to reach the consistency of your earlobe. The secret to making it delicious is to mix it well.


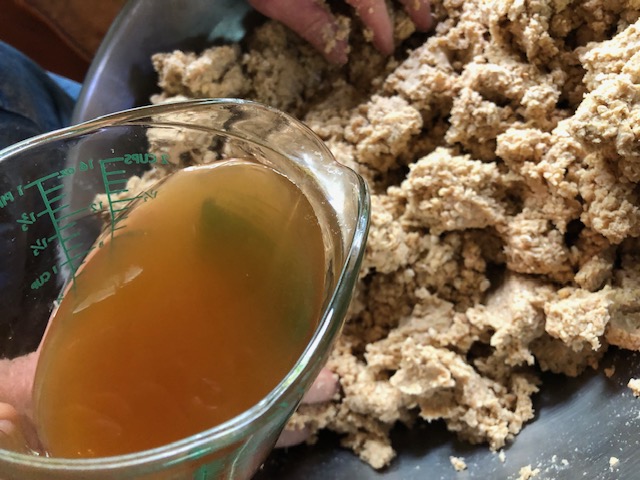
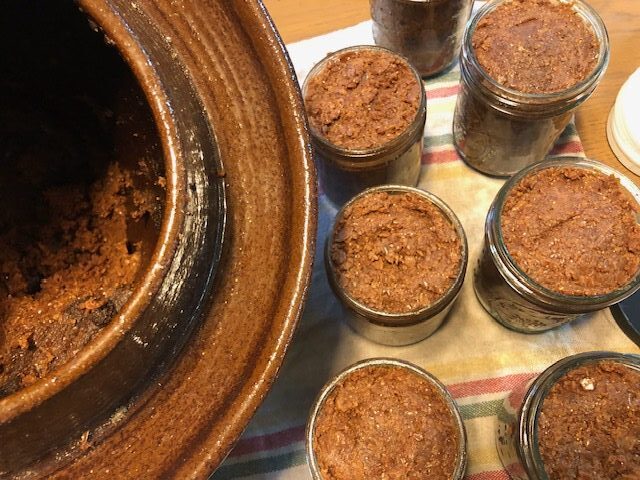
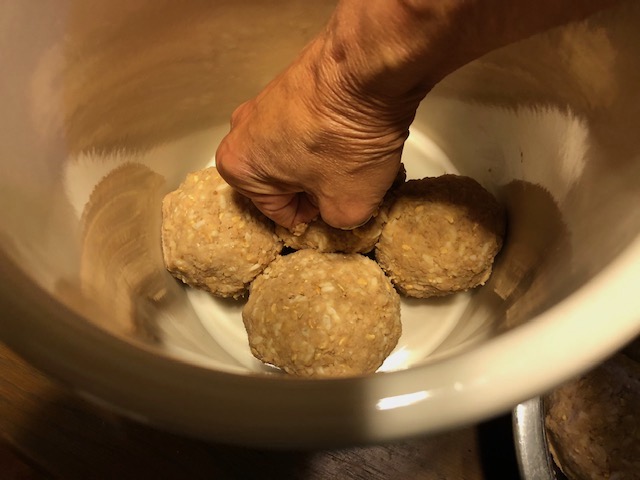
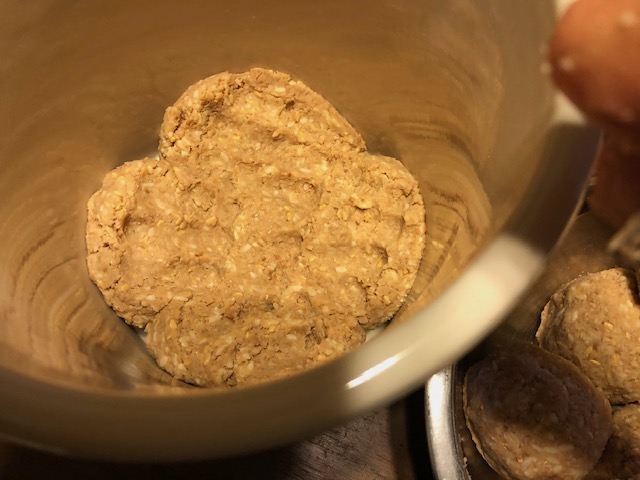
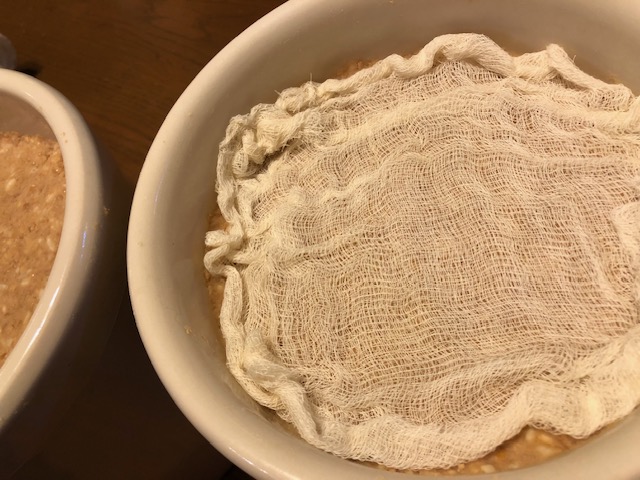
8. Mix until there are no leftover soybeans left, then roll a handful at a time like a rice ball. Then, place them one by one in a container (I use a ceramic jar) and press them down to flatten the surface while removing the air. The sides are prone to mold, so make sure they are flat.


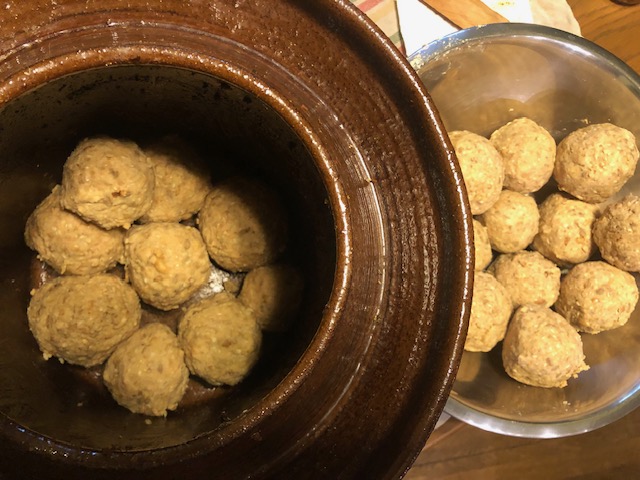
9. Spread organic cotton cloth, thin cheesecloth, etc., flat on the surface, and place a baking sheet on top to prevent air from entering.

Some people find it practical to spray alcohol on the surface (if you don’t have one, sprinkle shochu or salt lightly and evenly) to reduce the amount of mold that grows, but I don’t do that.


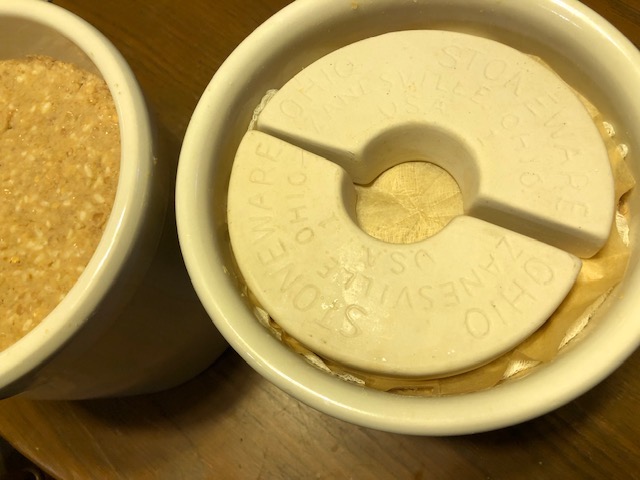
10. Finally, add a weight (preferably about 30% of the weight) and put a label to complete.

Where to Place:
Place the container away from direct sunlight. No Refrigerators! Miso has the property of absorbing odors, so avoid placing it near things with strong odors.
If you are planning to do Tench Gaeshi, I recommend that you write down the date of preparation, around the time of Tench Gaeshi and when it will be ready to sue so you don’t forget.

Tenchi Gaeshi:
Tenji Gaeshi is good to do between mid-July and early August. Remove the weight, baking sheet, and cloth, then remove any black mold that has formed on the surface. The whitish stuff is called acid-film yeast and is not harmful to the body.
However, mixing it with miso will spoil the flavor of miso, so try to remove it as much as possible. Flip the miso upside down to incorporate air. It eliminates the carbon dioxide produced during fermentation and introduces oxygen to promote better fermentation. This is sealed again, as shown in numbers 8 to 10 in the diagram on the left, and left to ripen until winter.

Purpose of Tenjigaeshi:
・Remove the mold so as not to spoil the flavor of the miso.

・Turn it upside down and release the generated gas.

・ Sends oxygen

・Promotes enzyme activity

・Uniform the hardness


Completion
The expected completion date is at least one year. Miso becomes more delicious after the hot summer (possibly two summers), and you can start eating it as early as you like after the summer has passed. I recommend two years aged miso.

When it is finished, remove any mold and turn it upside down to make it even. Additive-free miso will continue to ferment, and the color will darken, but it will not spoil and can be enjoyed for a long time. If you want to stop fermentation, put it in the refrigerator. If you use it while fermenting it, store it at room temperature and remove the mold before eating.


If any of you make Miso using my recipe and have questions, let me know.

Love, 

Sanae ❤️

Homemade Pickles Class

Wow, it has been three years since I taught my cooking class.

I was teaching plant-based macrobiotic cooking classes for over 20 years; one of the popular cooking classes was “Homemade Pickles”.
Why homemade pickles are a popular class because many pickles that you buy in the stores are made with preservatives and have even refined sugar.
Also, not easy to find organic ingredients pickles, and if you find ones they are pretty costly, so it is better to make at home.
Another big reason everyone loves pickles because there are lots of health benefits; it helps digestion, vitamins, fiber, and probiotic cultures, and it is easy to make if you follow steps!

I was scheduled to teach another Pickles class in spring 2017, but I had to cancel it.
I had to stop working completely to heal myself.
Since then, I was asked if I am going to teach how to make pickles again many times.
So my answer was, “I hope so.”
I am happy to let you know that my answer is now…

“Yes, I am teaching how to make pickles again!”

I am well now physically and emotionally.

I appreciate Ginat and Sheldon Rice to asked me to teach at their Whole Health Macrobiotic Forum-A Free Online Zoom Seminar.

July 1, Wed. 7 ~ 7:45 pm Israel time (California time 9 ~9:45 am PST).

https://us02web.zoom.us/j/3706191853.

It recoded and showing on Youtube after the live zoom.
The YouTube link is https://www.youtube.com/watch?v=e0N9IVedOlw

I hope you can watch and let’s make homemade pickles together!


Here are what pickles I am making and the ingredients so you can try to make delicious pickles with me.

Pounded Cucumber with Umeboshi Plums Pickle

Ingredients:

3~4 Cucumbers (Japanese or Mediterranean kind with no or fewer seeds)

3~4 Umeboshi plums


Nappa Cabbage with Five Flavors Pickle

Ingredients:

1/4 Nappa cabbage (about 1/2 lb = 250g)

1 Tablespoon Sea salt (about 15g =6 % of the weight of Nappa cabbage)

4~5 Red Radishes (about 100g = 1/4 lbs)

20 g Scallion (about 3~5 green part)

10~15 g Ginger (about one tablespoon)

5 g Kombu (thinly cut or sliced)

100g Apple, grated (about one apple)


Carrot Miso Pickle

Ingredients:

Carrot
Miso

(Quantity of Carrot and Miso depend on the size of glass jar)

One glass jar


I hope you enjoy this class and see you soon!


Love,
Sanae ❤️

How Important It Is to Have Whole Grains Everyday!

After I got ovarian cancer 24 years ago, I learned the macrobiotic way of life. I healed the cancer with macrobiotic foods, many holistic approaches, and a natural lifestyle. I also had a serious car crash 15 years ago. I was in a coma for three days, and since my left lung and heart were crushed, they stopped working several times. Both my knees and feet were also badly crushed. The doctor told me I would not be able to walk, but I did not give up; I continued macrobiotics.


I started to move around after one year of bedridden life. I was able to transfer my body to a wheelchair, so I eventually went to yoga class every week. I still have pain all the time and take care of my physical and emotional disability. I had to build a strong will and discipline my mind. Macrobiotic, well-cooked, whole-grain foods have helped me keep the core of my strength.


My husband Eric and I have been cooking most of our foods at home with carefully chosen, organic ingredients, including whole grains, beans, fresh produce, sea vegetables, seasoning (sea salt, miso and tamari—soy sauce with no gluten), and condiments (umeboshi plum, gomashio, tekka, etc.). Also, we live a lifestyle that fits our healthy minds and bodies. We are active. Eric goes to the beach for his SUP surfing every weekend and goes skiing in winter. I practice yoga, and since last year, I teach it.


Traveling is fun and exciting, but it is not possible to eat like at home. We eat things that we are not used to, so our bodies have to adjust. We can avoid meat and other animal foods, but oil, spices, preservatives, non-nutritious salt, refined sugar, artificial sweeteners, and more are not easy to identify—so we lose our health balance sometimes.


The trip we had this March was the cruise of Caribbean of MSC ship which also serves Holistic Holiday Cruise (they are also call macrobiotic cruises) food once a year, so we have had travel with Holistic Holiday twice before so we trusted that we’d be all right. But we were disappointed, because this time was different from what we had before. There were almost no whole grains (brown rice), leafy greens, or sea vegetables. It was definitely vegan, plant-based food, but not macrobiotic.


I enjoyed the trip with Eric’s mother, aunts, cousins and nephew, but I think I lost my balance doing too much. I walked too much in Jamaica, so I was exhausted, and my feet were in so much pain—but I did not rest and instead went to a recovery panel to speak. I went to the dining room, which was even colder than usual, and they served only white pasta with tomato sauce for the vegan table. I was shocked and went to my stateroom to take a hot shower, but I already had a fever of 102. Since I was a child, a fever is my body’s signal when I lose balance. Unable to eat whole grains this trip, I realized how I was not able to keep my balance. Since I could see the ocean everyday, I found a way to keep my balance through my meditation.

650 IMG_7705

With Eric’s mom, her sisters, and brother-in-law.


I was so happy to be home and welcomed by our dog and cat family. I am now taking time to recover from losing my health balance this time. I realized once again that the purest foods we can prepare are in our own kitchen. Whole grains are most important for a macrobiotic life.

Here are blogs I wrote about blogs with recipes:

Traditional Brown Rice Cooking without a Rice Cooker (well-cooked brown rice)

How Many Whole Grains Do you know Besides Brown Rice?


My goal for 2017 is not to push too much, so I postponed the pickle-making class—but I hope to offer it soon.

Here is a pickle recipe blog for you, in case you were looking forward to coming to the pickle-making class.


With gratitude to be healthy and happy!

—Sanae

Furofuki Daikon

Daikon means “big” (dai) “root” (kon) in Japanese. It is a big white radish you see at Asian markets and most health stores and farmers’ markets now.


When I was a child, up to 20 years old, I did not like to eat daikon unless it was made like spicy kimchee pickles. But my mother said, “Don’t worry: I did not like to eat daikon, either. I love them now, so you will love eating them when you grow up.” She was right.


Now, daikon is one of my favorite vegetables. Daikon grows in spring, summer and autumn/winter, but I love the autumn/winter (the end of October to February) ones the best. Many different kinds of daikon are available in America. Each has a slightly different taste, and the harvesting season also affects the taste. I think the summer daikons are a little bitter and winter ones are sweeter, but you can taste and find out for yourself.


Daikon helps eliminate excess water and animal fats from the body and has a wide range of medicinal uses. It also aids in the digestion of whole grains and vegetables. Here’s a quick breakdown of the health benefits:


Health Benefits of Daikon

Respiratory Health: The combination of antibacterial and antiviral activity with the expectorant properties of daikon and daikon juice make it ideal for clearing up respiratory symptoms. Daikon juice not only clears out phlegm, but also eliminates bacteria and other pathogens, keeping your respiratory system healthy.

Digestive Health: Daikon juice has been shown to possess enzymes similar to those found in the human digestive tract, including amylase and esterase.

Detoxification: Daikon has a diuretic benefit; it helps keep the kidneys clean and functioning at a high level by stimulating the elimination of excess toxins, fats, and even water through urination.

Cancer Prevention: Daikon not only has a high nutrient content, but it also possesses certain antioxidant phenolic compounds that have been shown to reduce various types of cancer, particularly of the stomach.

Immune System: The high concentration of vitamin C in daikon makes it an ideal partner for your immune system.

Anti-Inflammatory Action: Research has found that the level of anti-inflammatory compounds in daikon juice and the normal roots and leaves can significantly decrease inflammation throughout the body, lower the chance of developing arthritis, treat gout, and ease discomfort and pain from injuries and strained muscles.

Bone Health: Daikon is a rich source of calcium, which is essential for bone health. If you are at risk for developing osteoporosis or are beginning to feel the pain of your age, adding some daikon and calcium to your diet can definitely improve your conditions and slow the natural aging process.

Weight Loss: It is low in calories and contains no cholesterol, but it’s high in fiber and nutrient content, making it a weight-loss aid. It fills you up and gives you essential nutrients for your day without significantly boosting the number of consumed calories or cholesterol in your diet.

Skin Health: The antioxidant properties of daikon help to prevent the effects of free radicals, the harmful byproducts of cellular metabolism. So, you can use daikon juice or a slice of daikon for bug bites and other skin irritations.

A Word of Warning: Some evidence suggests that daikon and other radish varieties shouldn’t be eaten by people with gallstones. Other than that, daikon is not commonly known as an allergen and is generally considered healthy for anyone.

Source: Organic Facts


Furofuki Daikon (Simmered Daikon) Recipe

From Love, Sanae

650 Plant Based School Furofuki Daikon 700


MAKES 4 SERVINGS


8 rounds (each 3/4″ thick) daikon radish

2 strips (each 7″ long) kombu

4–5 tablespoons tamari

2–3 tablespoons sesame seeds, washed

2 tablespoons barley miso

4–5 cups spring water


  1. Put the kombu in a pot; layer the daikon on top.
  2. Add water to half-cover the daikon, and bring it to a boil.
  3. Add 1–2 tablespoons tamari for each cup of water. Cover and reduce heat to low. Simmer until daikon is tender, about 30–40 minutes.
  4. To make sesame-miso sauce, dry-roast the sesame seeds in a heavy skillet over medium-­high heat, until lightly toasted and fragrant. Stir constantly.
  5. Place toasted seeds in a suribachi and grind to a paste.
  6. Blend in miso, and thin the mixture with 2–3 tablespoons of the cooking liquid.
  7. Serve the daikon topped with the sesame-miso sauce.


Enjoy!

Love, Sanae 💖

California Organic Umeboshi Plums and Recipe

Umeboshi plums offer really good medicinal benefits for everyone. During the holiday season, most of us eat too much; Umeboshi Twig Tea (Kukicha) Remedy Drink helps our intestines and alkaline levels (recipe below).

Umeboshi Plum with Twig Tea (Kukicha) Remedy

The combination of umeboshi plum and twig tea (Kukicha) is good for strengthening the blood and circulation through regulation of digestion.

MAKES ONE SERVING

one-half or one umeboshi plum
1 cup Kukicha (twig tea), brewed

To make the drink:

  1. Place the umeboshi in a tea cup.
  2. Pour in hot tea and stir well. Drink while hot and eat the plum.

Resource from Love, Sanae cookbook which has  many recipes of Umeboshi plums.

650-umeboshi-kukicha

Photo: Umeboshi Plum with Twig Tea (Kukicha) Remedy


We have been offering California organic umeboshi plums since 2011. My longtime friend Kazuko and her husband, Jyunsei, planted about 450 ume plum trees after they move to the US in 1968. It was their dream to make California organic umeboshi plums. They also grew organic red shiso leaves (Japanese medicinal herb beefsteak) on their property in order to make umeboshi plums (the plums’ color comes from red shiso leaves).
They made their umeboshi plums in the truly traditional way: They grew the ume trees organically, picked the plums by hand, and sun-dried them for three days under California’s long hours of sunshine. When I went to help them make the plums, I learned to continuously turn each one for hours so it wouldn’t get burned or stick to the bamboo mat.

650-umeplum-drying-on-bamboo-mat

Photo: Drying ume plum before pickling with red shiso leaves


For many years, Jyunsei and Kazuko have used only selected sea salt and organic, home-grown red shiso leaves to make their premium hand-made California organic umeboshi plums.

Jyunsei passed in 2000, and Kazuko kept up the work by herself, but she eventually retired in 2008. Since Jyunsei passed, Kazuko was not able to promote her umeboshi plums widely. Settled in a retirement home now, she still has the plums but no access to sell them. We decided to help her and seize this opportunity to spread the love and care with which she and Jyunsei prepared these plums. We have sold at least 400 pounds of them all over the US. I even gave them to Japanese friends as gifts, and they said they never see such high-quality aged organic umeboshi plums in Japan anymore.

The plums we received from Kazuko were made in 2003–05, so they are aged. They contain more alkaline and super enzymes with high healing properties than any umeboshi plums you can find anywhere.
Umeboshi plums are like wine; the aged ones are rich in enzymes and have a naturally sour, delicious flavor. Most companies limit their production to a yearly basis, and many of them are not organic, while others use preservatives. So, this is a rare occasion to find aged, organic umeboshi plums.


We have a limited quantity, so if you want to get these special California organic umeboshi plums, click here to order.

650-umeboshi-plum-in-a-container


When you receive the plums, transfer them to a glass jar or container and keep them in a cool dark place—but not in the refrigerator—to preserve the enzymes and healing properties.


Hope you get to taste these rare umeboshi plums before they are all gone.

Love,

Sanae💖


Kula, Golden Retriever Life With Her Cancer, Part 5: Keeping Healthy Gums

After Kula was diagnosed with spleen cancer she was not able to walk so I decided to do all-holistic bodywork to help her walk again.

Morning body routine before morning remedy drink and/or breakfast:
1. Massage her gums
2. Body scrub
3. Shiatsu
4. Do-in exercise

I felt that massaging Kula’s gums were important, since she had abuses on her left-side gums, as you can see in the photo. Her gum area was discharging pus. Holistic veterinarian Dr. Lane showed me how to make a gum rinse formula with green tea and myrrh essential oil (which is very good for gums and can also be used as a mouthwash to help eliminate dental infections) and massaged her gums with loquat tea (made from loquat leaf) and sea salt every day.

Here I am showing photos of Kula’s abscess how it got better.

650 Kula gum abuses

Holistic veterinarian Dr. Lane is disinfecting Kula’s abscess on May 27, 2016


650 Kula's gum on 05-27-16

Kula’s abscess gum on May 30, 2016


650 Kula gum 05-30-16

Kula abscess gum on June 3, 2016


650 Kula gum 07-29-16

Kula’s abscess on July 15, 2016


Recipe

For dogs:
1 cup green tea or loquat leaf tea
2 drops myrrh essential oil (if for cats, I just use sea salt, since cats are very sensitive to essential oil)

For people:
1 cup green tea or loquat leaf tea

4–5 drops myrrh essential oil


650 Gum massage oil-water

Loquat leaf and the tea and myrrh essential oil with a soft gum brush


Use a very soft, small toothbrush. If you want to, you can use your finger (usually index).

Photo: Toothbrush and loquat leaf

In this video, I am massaging Kula’s gums.

Wishing healthy gums and teeth for your dog and you!
Love, Sanae 💖